
Ongoing WMS Setup
Connect your 3PL warehouse so the chatbot can sync returns and only refund orders that have not been picked yet.
Do I need this?
Only if your fulfilment is run by a 3PL using Ongoing WMS. If your warehouse uses something else, skip this article. If you do use Ongoing, this integration is what makes returns and cancellations actually work end-to-end — the standard Shopify ↔ Ongoing app alone does not push return parcels into the WMS.
What this integration does
There are two separate features, and you can turn them on independently. Most stores want Smart Returns. Smart Cancellations is optional and only useful if you want the chatbot to refund automatically.
Smart Returns (recommended)
When the chatbot creates a return label for a customer, we also push a return order into Ongoing WMS with the carrier tracking number attached. This means:
- The warehouse sees an incoming return before the parcel arrives.
- When the parcel is scanned at the dock, staff can immediately identify which order it belongs to.
- The return is linked line-by-line to the original order, so refund decisions are easy.
Without this, a returned parcel arrives at the 3PL with no context — staff have to manually match it to an order, which is slow and error-prone.
Smart Cancellations (optional)
When a customer asks the chatbot to cancel an order, we ask Ongoing whether the warehouse has already started picking it.
- If not yet picked → the chatbot can cancel + refund automatically.
- If already picked or packed → the chatbot stops, explains, and creates a ticket for your team.
Without this, the chatbot either has to refuse every cancellation, or risk refunding orders that are about to ship.
Setup overview
What you will need
Ongoing WMS access is owned by your 3PL — not by you. Ask them to create an API user for your goods owner and send you four values. They'll find the setup at Administration → API for goods owners in Ongoing.
1. Warehouse slug
The slug your 3PL uses to log in to Ongoing. For example, if they log in at `wms1.ongoingsystems.se/acmewarehouse/login.aspx`, the slug is `acmewarehouse`. Supportify builds the full API URL from this automatically.
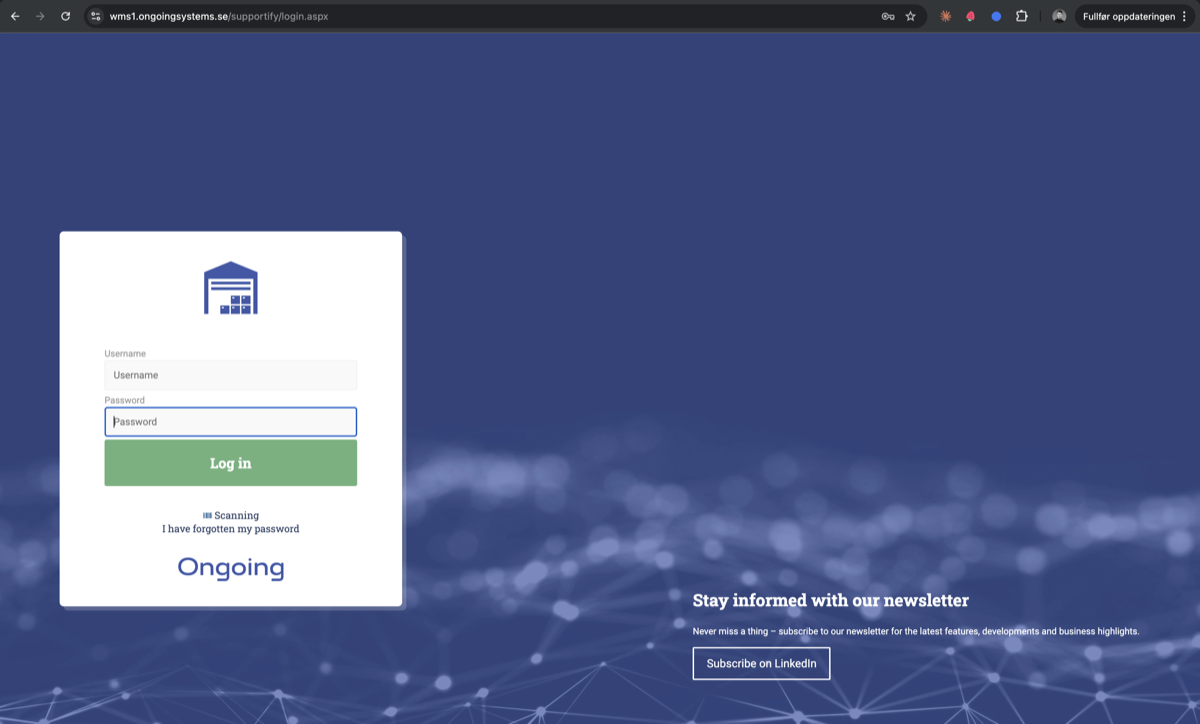
The warehouse slug is the part of the URL between `ongoingsystems.se/` and `/login.aspx`.
2. API username and password
For the API user the 3PL creates inside Ongoing — not the username they use to log in to the web UI. The system auto-prefixes the username with `WSI…`; that prefix is part of what you paste into Supportify.
3. Goods Owner ID and name
Every 3PL hosts many stores ('goods owners') inside one Ongoing warehouse. Your store is one of them. Your 3PL sees the ID and name in the search on the API for goods owners page (e.g. `102 — Acme Store`). If the API user has permission to list goods owners, our wizard fetches this automatically and you don't need to enter it manually.
Goods Owner vs Warehouse — what is the difference?
Warehouse = your 3PL's Ongoing tenant (the part in the URL). One warehouse hosts many stores.
Goods Owner = your store inside the 3PL's warehouse. This is where your orders and inventory live.
You only have one goods owner. Your 3PL knows which one you are.
Step-by-step
- Forward the email template below to your 3PL contact.
- Wait for them to send you the four values.
- In Supportify go to Settings → Integrations → Ongoing WMS → Setup.
- Pick which features you want (Smart Returns, Smart Cancellations, or both).
- Paste the credentials, click Test Connection, and pick your goods owner from the list.
- Save. You are done.
Email template to send to your 3PL
Copy this and send it to whoever manages your fulfilment at the 3PL. It tells them exactly what to set up — they will recognise the terminology.
Subject: API access to Ongoing WMS for our customer support chatbot
Hi,
We're connecting our customer support chatbot (Supportify) to your Ongoing WMS so it can:
- Push return orders into the WMS with the carrier tracking number attached, so your warehouse staff can identify returned parcels the moment they arrive at the dock.
- Check the pick status of an order before the chatbot allows a customer to cancel and refund it.
What we need you to do (it should take about 5 minutes):
- In Ongoing WMS, go to Administration → API for goods owners.
- Find our goods owner in the search and select it.
- Create a new API user with these settings:
- Choose a username (the system will auto-prefix it with `WSI…`).
- Either set a password directly, or tick "Send an email to the user and allow them to choose their own password" and use our email instead.
- Tick the permission "Allow this user to access the Goods Owner Returns REST API". The other two permission checkboxes (invoicing info, automatic printouts) are not needed.
- Click Create.
Then please send us these four values (over a secure channel — password manager share link, or encrypted email):
- Warehouse slug — the part of the URL when you log in to Ongoing. For example, if you log in at `wms1.ongoingsystems.se/acmewarehouse/login.aspx`, the slug is `acmewarehouse`. We'll build the API URL ourselves from this (`https://api.ongoingsystems.se/{slug}/api/v1`).
- API username — the full username including the `WSI…` prefix.
- API password.
- Goods Owner ID and name — visible in the search results on the API for goods owners page (e.g. "102 — Acme Store").
If REST API access is not yet enabled on your Ongoing instance, please contact Ongoing support — they enable it per customer.
Thanks!
For your 3PL: setup instructions
If you are reading this as the 3PL — here is exactly what to do. You only need to do this once per goods owner.
1. Confirm the API is enabled
Supportify uses the Goods Owner REST API (sometimes called API för varuägare). This is the standard REST API at `api.ongoingsystems.se/{warehouse}/api/v1`. We do not use the Automation API. If REST API access is not yet enabled on your Ongoing instance, contact Ongoing support — they enable it per customer.
2. Open the API for goods owners page
Log in to Ongoing WMS and click Administration in the top navigation, then choose API for goods owners from the menu.
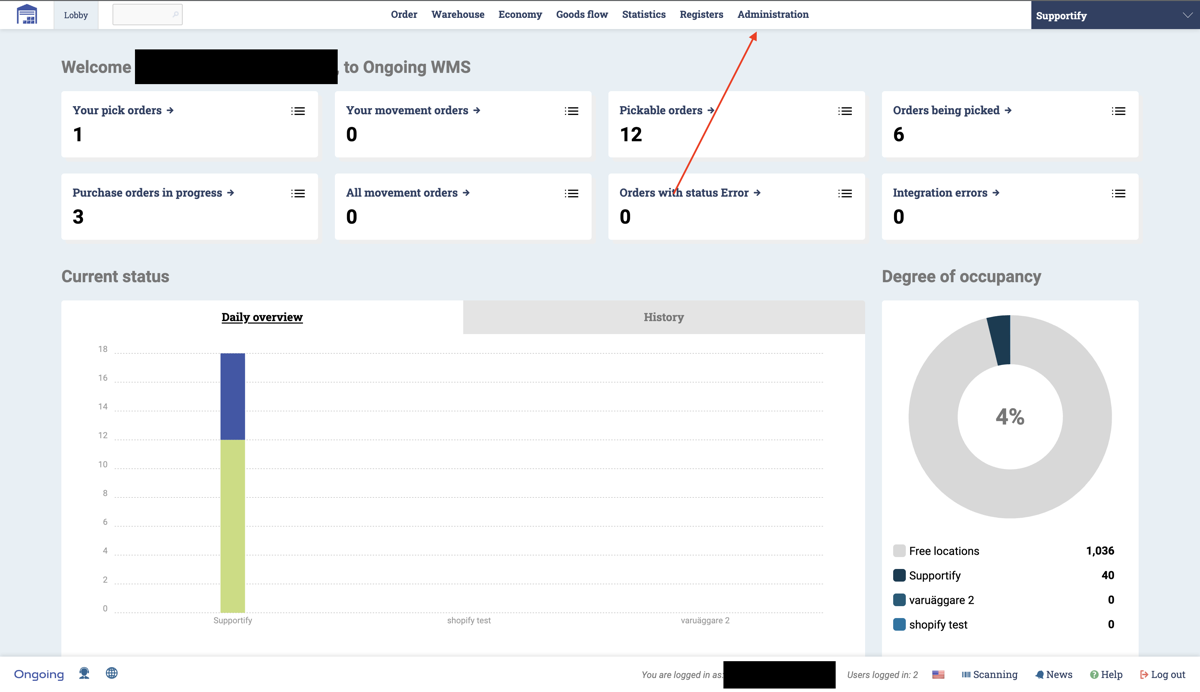
Step 1 — click Administration in the top navigation.
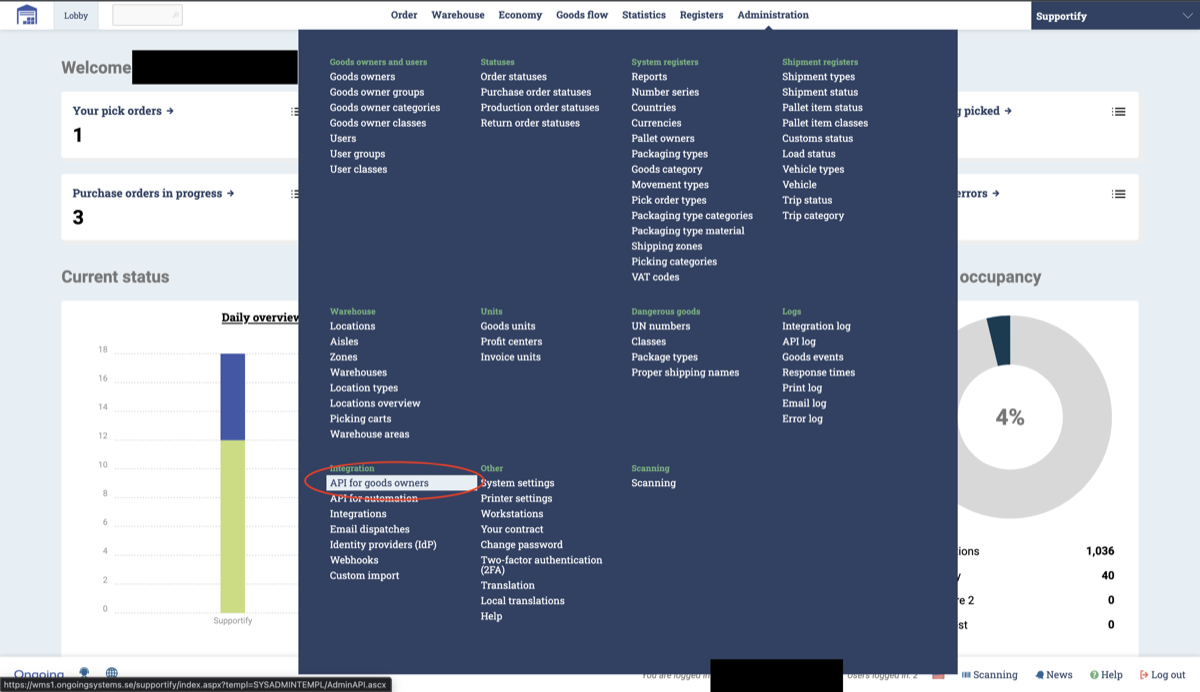
Step 2 — click API for goods owners under the Integrations column.
3. Create the API user
On the API for goods owners page:
- Use the search at the top to find the merchant's goods owner. Note the Goods Owner ID (a number, e.g. `102`) and the goods owner name — the merchant needs both.
- In the API user section, enter a Username. Ongoing auto-prefixes it with `WSI…` — that prefix is part of the final username.
- Choose how to set the password:
- Either type a password directly, or
- Tick "Send an email to the user and allow them to choose their own password" and enter the merchant's email — they'll set their own password.
- (Optional) Fill in Integration partner with `Supportify` and Type of integration for your own records.
- Under Permissions, tick the box: "Allow this user to access the Goods Owner Returns REST API. This API allows the user to return goods to the warehouse." — this is the only permission Supportify requires.
- The other two permission boxes (invoicing info, automatic printouts) are not needed and should be left unchecked.
- Click Create.
IP filter
You can leave the IP filter as `< None >`. Supportify's outbound IPs are not static, so locking the API user to a fixed IP will break the integration.
4. Send the credentials
Send the merchant these four values, over a secure channel (password manager share link or encrypted email):
- Warehouse slug — the part of your Ongoing URL between `ongoingsystems.se/` and `/login.aspx` (e.g. `acmewarehouse`).
- API username — including the `WSI…` prefix.
- API password — or confirmation that you sent a set-your-own-password email to the merchant.
- Goods Owner ID and name — e.g. `102 — Acme Store`.
5. What to expect afterwards
Return orders: Supportify will `PUT /returnOrders` whenever a customer creates a return through the chatbot. The return order will have the carrier waybill in the `tracking` array, the original order linked via `customerOrder.orderId`, a comment with the customer's reason, and per-line `returnCause` values.
Order cancellations (if enabled): Supportify will first `GET /orders` to read the warehouse status, and only `DELETE /orders` if the status is below 320 (i.e. not yet allocated). If picking has started, we abort and create a ticket instead.
Read traffic: We read orders, return orders, shipments, and stock levels on demand when customers ask the chatbot questions. Volume is modest — roughly one to a few calls per chat session.
FAQ
Doesn't the Ongoing-Shopify app already do this?
Partly. The Ongoing-Shopify app syncs order cancellations from Shopify into Ongoing (as long as picking has not started) — but it gives no feedback to the chatbot about whether picking has started, so the chatbot can’t safely auto-refund without our integration.
For returns the story is different: the Ongoing-Shopify app is designed for returns performed in the warehouse to be reported back to Shopify, not the other way around. So returns initiated by your customers in the chatbot do not make it into Ongoing without this integration.
What happens if Ongoing is down when a customer creates a return?
The Shopify return and the shipping label are still created — the customer is not blocked. The Ongoing push is retried, and if it ultimately fails the return is still visible in Supportify with the tracking number, so your warehouse can be notified manually.
Can I turn off Smart Cancellations later?
Yes. Open Settings → Integrations → Ongoing WMS and toggle Sync cancellations. The chatbot will fall back to creating a ticket for every cancellation request.